In order to get your Facebook Cloud API you will need a few things.
You will need a Facebook Account
You need to own a Facebook Developers Account.
You need to create Facebook App through a Facebook Verified (or unverified) Business / Individual account.
Through the above, you will then be able to optain 3 things.
WhatsApp Business ID
WhatsApp Phone Number ID
Permanent User Access Token
STEP 1 – CREATE A FACEBOOK DEVELOPERS ACCOUNT
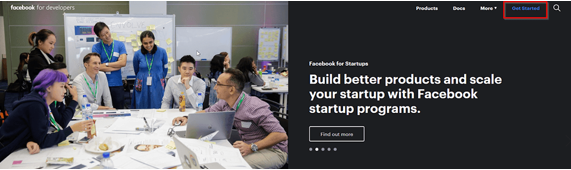
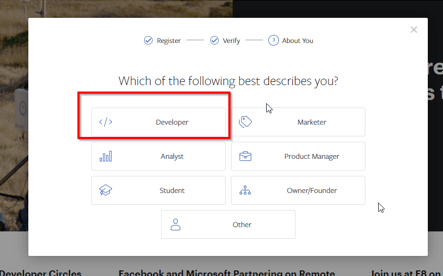
Login to your Facebook account and navigate to Developers Section Click on Get Started button from top right corner.
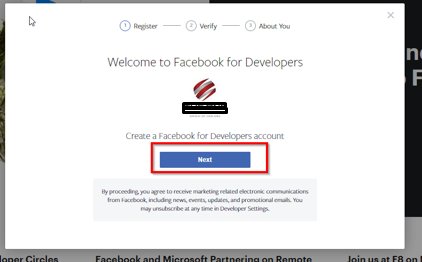
2. Click on next button from the popup
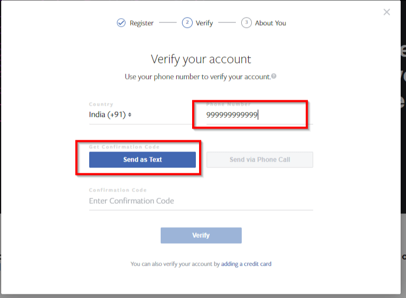
3. Enter your phone number and verify your account using text message or phone call.
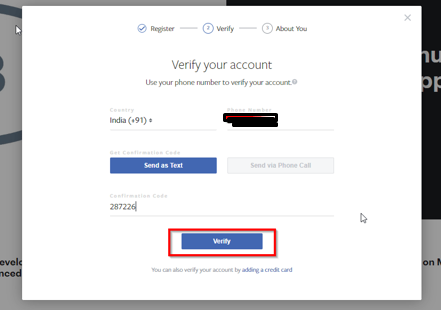
4. Then enter verification code you got and click on the Verify button. (you may be asked to re-verify your account)
5. On the next screen, after verifying your account, 3rd step is to tell about you. Select Developer option here and no further steps will be required.
STEP 2 – CREATE A FACEBOOK APPLICATION
Please follow the steps of the videocasts below, so you can create a Facebook Application needed for sending WhatsApp messages through our Module
Remember to take down the PHONE NUMBER ID & WHATSAPP BUSINESS ACCOUNT ID
STEP 3 – CREATE A PERMANENT ACCESS TOKEN
Now that you are done with the Application Creation, you need to create a Permanent Access Token. This video, demonstrates the way to do so
Below are some sample Facebook Message Templates .
Client Password Change Template
This WhatsApp Message is sent when an Admin changes the user’s module Password .
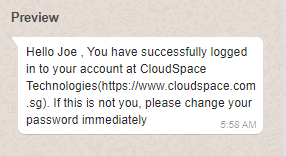
Client Login Message Template – Sample
This WhatsApp Message is sent when a user successfully logs into the system which you need to create in your Facebook/Twilio Message Templates Section
Hello {{1}} , You have successfully logged in to your account at CloudSpace Technologies(https://www.cloudspace.com.sg). If this is not you, please change your password immediately
Client Registration Message Template – Sample
This WhatsApp Message Template is sent when a user successfully registers into your system which you need to create in your Facebook/Twilio Message Templates Section
Dear {{1}}-

Welcome to CloudSpace Technologies, Thank you for signing up/registering as a member with us. We're thrilled to have you onboard.
As a registered member with CloudSpace, you would have access to all your information, available to you immediately. At CloudSpace, we would take care of all your online needs.

You would be able to track your invoices, order new service, and even manage all your services.

==============================
Your Information Registered With CloudSpace
Name *{{1}}* -
Company Name *{{2}}*
You would receive an email for verification before you have full access to your account. .
==============================
If you do have any questions or if the information stated above are wrong, please feel free to contact us
Client Invoice Created Message Template
This WhatsApp message will be sent when an Admin creates a new Invoice for the user
Dear, {{1}}

Thank you for choosing CloudSpace Technologies as your preferred partner for your IT Services & Solutions. Please take note that Invoice {{2}} is due for payment.

===========================
INVOICE DETAILS
===========================

Invoice Number: {{3}} -
Invoice Due Date: {{4}} -
Invoice Total: {{5}} -

You can choose to pay the invoice online. We accept the following payment methods through HitPay.

PayNow Online
MasterCard/Visa
GrabPay/Grab PayLater/Atome/Shopback PayLater (Up to 4 or 6 Installments)
Shopee Pay/Fave

Please login to your customer portal to view your invoices.
Invoice Paid Message Template
This WhatsApp message is sent when payment has been made.
Hey {{1}}

We have received a payment for an invoice, please check the details below

=====================
Invoice ID - {{2}}
Invoice No. - {{3}}
Total Amount - {{4}}
Invoice Due Date - {{5}}
Transaction ID - {{6}}
Invoice Status - {{7}}
=====================

Please login to the admin area to view this payment.
Cancellation Request Message Template
This WhatsApp message is sent when an user requests to cancel their services
Dear {{1}}

This Notification is to confirm that we have received your cancellation request for the service listed below.

Product/Service: {{2}}
Domain: {{3}}

We will review your request and let you know the outcome asap. Meanwhile we appreciate your patience

Thank you for using CloudSpace Technologies and we hope to see you again in the future.
Domain Registration Message Template
This WhatsApp message is sent when an user registers for a new Domain
Hey {{1}}

A client has just registered a new domain with CloudSpace. Please find the details below

========================
CLIENT DETAILS
========================
Client ID - {{2}}
Client Full Name - {{3}}
Client Email Address - {{4}}
Client Contact No. - {{5}}

========================
DOMAIN DETAILS
========================
Domain Registered - {{6}}
Registration Period - {{7}}
Registration Date/Time - {{8}}

========================
INVOICE DETAILS
========================
Order ID - {{9}}
Service ID - {{10}}
Invoice No. - {{11}}T
Total Amount - {{12}}
Invoice Due Date - {{13}}
========================

Please login to the admin area to view and process this order.
Two-Factor Authentication Message Template
This is a WhatsApp message sent for a Two-Factor Authentication
Dear {{1}} -
Your request to login to CloudSpace Technologies requires an One Time Password(OTP)
Your Secured OTP Code is *{{2}}* -
Please do not share this code with anyone.

If for some reasons you're unable to login, please do contact us and we will resolve the issue for you.
We will update this page when new versions or new features have been released.
Version 1.2.4 Updated on 01/05/2023
Fixed various minor bugs
Added an update checker function which will notify users if theres an update to the module.
Version 1.2.3 Updated on 27/04/2023
Fixed various bugs
Added new Notification for Admin Support Tickets opened by client
Added Client Notification for Tickets opened by Admin
Added Notification where any support tickets opened, Admin receives a copy
Fixed a bug where support tickets by client was mapped to the wrong template
Added Information symbols and text messages to let users know about each notification and whats the trigger about
Added Delete and Export buttons for logs and debug for users to send to our dev team if they have an issue.
Fixed a bug where Ticket Status Change dosent trigger when a Ticket is closed.
Changed the text for 2FA message during activation
Version 1.2.2 Updated On 25/04/2023
Fixed a bug where Admin New Order Template not showing Service ID/Order ID/Domain & Package name
Fixed a bug where Admin New Domain Registration template not showing OrderID & ServiceID
Fixed a bug where Admin New Support Ticket Template not showing TicketID, Ticket Priority and Ticket Status
Fixed a bug where TicketID is reading DB’s Ticket ID instead of actual Ticket ID from subject
Added new variables like “IP” “Hostname” “Domain Reg Period” “Currency” “Currency Symbol”
Added Admin Marketing Template for Admins to send messages to ADMINS only.
REMOVED phone number field on Settings page
ADDED phone number field to ADMINS SETTINGS page.
Version 1.2.1 Updated On 24/04/2023
Added Radio Selectors for marketing tab where admins can select Marketing templates to be sent to either Clients or Admins only.
Added Admins tab for administrators to input their phone number as WHMCS dosent support contact numbers for administrators.
Added more whatsapp notification preferences under client area and admin area.
Fixed bugs where some notifications were failing to send.
Fixed bugs where updating template variables caused other variables to auto change within the same template.
Version 1.2.0Updated On 21/04/2023
Added a NEW Marketing feature. This feature can be useful for users who are trying to promote a product or even send wishes to customers in their system. This feature will send WhatsAPP Messages to EVERY USER in the system. A Message template is required in order to send this message.
Added a NEW test feature for testing purposes. You can create a message template with all the variables just for testing the whatsapp script to see if it reads the variables correctly. This will help you and the dev team during bug reporting as well.
Added many new variables.
Version 1.1.1Updated On10/03/2023
Added a NEW debug feature for WhatsApp Messages. This will allow users to check for failed messages and the reasons why it failed in order to rectify it. The debug feature will show up to 15 last sent messages only as to reduce server load.
This article describes how to install WhatsApp Notification for WHMCS module. Installing this module is very easy and should not take more than a minute. We assume you already have a working WHMCS system with admin privileges.
Tip 1: This guide is written for users without much WHMCS experience, so if you’re familiar with WHMCS, feel free to skip the obvious parts.
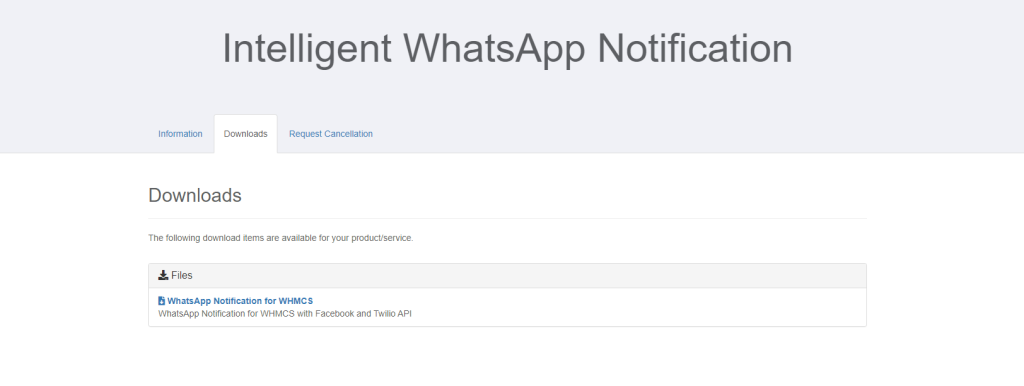
1. Purchase
First of all, you will need a valid purchase of the WhatsApp Notification Module for your WHMCS. If you have not purchased the module, please do so by clicking on the following link.
This article describes how to install MinervaKB plugin. Installing knowledge base is very easy and should not take more than a minute. We assume you already have a working WordPress installation and a user with admin privileges.
Tip 1: This guide is written for audience without much WordPress experience, so if you’re familiar with WP dashboard feel free to skip the obvious parts.
Tip 2: This guide has a video version. Please scroll to the bottom of the article to watch it.
Plugin upload
First of all, login to your WordPress dashboard. In the left menu select Plugins – Add New.
Add new plugin
On the opened Add Plugins page select Upload Plugin in the top left corner of the screen.
Upload plugin
After that plugin upload form should appear with Choose File and Install Now buttons. Press Choose File and select the zip file you received from Envato via opened file select dialog. Next, hit Install Now to start the upload and installation.
Upload form
Activation
Next, after the installation process completes, press Activate Plugin button.
Plugin installation progress
After the activation you will be redirected to Plugins page. Notice the message at the top of the screen, saying you should setup the knowledge base home page.
Creating home page
If you already have a page you would like to use as knowledge base root, just click the link in the message and select it. In this tutorial we assume this is a fresh install and you do not have pages yet, so let’s go ahead and create one.
In the left menu select Pages – Add New. A new page edit screen will open. At this point we only need to enter some title and publish the page.
Create home page
We will use the title Knowledge Base throughout this guide, so please remember to replace it with any title you’ve selected.
Home Page setup
At this point you need to set your new page as knowledge base home page. In the left admin menu select MinervaKB – Settings.
Setup home page
From the dropdown “Select page to display KB content” select your newly created page and press Save Settings in the top right area of the screen.
Conclusion
That’s it, you have finished installing knowledge base. Congratulations! Your home page is set, you can open it and it should display the search already. Home page will start to display topics once you add any content. Please refer to articles on content creation to learn more about that. You can configure the home page layout in the Settings or you can use Page Builder to do that. Home page configuration will be described in separate articles.
You can watch the video of the steps described above (1m 38s, with English subtitles):
Client Login – Client will receive a WhatsApp Notification when they login to their client portal
Client Registration – When a new client registers in the system, The user will be sent a WhatsApp Notification. You can set this as a welcome message if you prefer.
Client Password Change – Clients can receive a WhatsApp Notification informing them of their changes in password.
Client Affiliate Account Activation – Clients will receive a WhatsApp Notification when their Affiliate account is activated.
New Invoice – Clients will receive a WhatsApp Notification when a new invoice has been created.
Invoice Paid – Clients will receive a WhatsApp Notification when an invoice is marked as paid.
Invoice Payment Reminder – Clients will receive payment reminders. You can set different templates for First/Second/Third reminders.
Service Cancellation Request – Clients can be notified regarding their cancellation requests
Domain Registration – Clients can be informed through whatsapp notification for domain registration.
Domain Transfer – Clients can be informed through whatsapp notification for domain transfers
Domain Renewal – Clients can be informed through whatsapp notification for domain renewals. You can set different templates for First/Second/Third domain renewal reminders.
Support Tickets – Client can be informed on responses regarding their support ticket directly in WhatsApp.
Service Information – Clients can receive notifications if their Service is Activated/Suspended/Terminated and Password Changes.
ADMIN Notifications – Cancellation Requests – Admin can get notified through WhatsApp when theres a cancellation requests.
New Orders – Admins can be notified if theres a new order placed in the system.
Domains – Admins can be notified when theres a new registration for Domains or renewals.
Invoices – Admins can be notified when invoices are paid.
Admins can be notified if a domain registration error occurs.
Tickets – Admins can be notified when a support ticket is opened, replied or a change of status.
CLIENT AREA
Clients can set their own desired WhatsApp Number in their client area
Clients can set their Notifications to On/Off
Clients can choose which Notifications they can receive and what not.
ADMIN AREA
Input API Access Tokens for Facebook Cloud API or Twilio WhatsApp API
View Individual Clients Message status
Set Individual Clients Message Settings and Set a customized WhatsApp Number. This setting will override the default customers mobile number from the WHMCS and send users WhatsApp on the number you have set.
Set message templates to each notifications available
IMPORT all the templates from Facebook Message Template API
MAP the templates variables to their parameters.
View DEBUG Logs of messages sent or failed.
Marketing Templates and Mass Sending of WhatsApp Messages to all USERS or ADMINS
Test Variable Features
×
Hello!
Click one of our contacts below to chat on WhatsApp